Walk into almost any showroom, office lobby, or dining room with a glass tabletop, and the reaction is usually the same: people notice the glass, maybe comment on how clean it looks, and move on. Nobody stops to ask what it took to get there. That’s by design — a well-fabricated tabletop is supposed to look effortless. But “effortless” is the wrong word for what’s actually happened before that piece of glass ever reached the room.
Designers and specifiers typically approach a tabletop from the outside in: what size, what shape, what finish, and whether it matches with the base. Fabricators approach the same object from the inside out — starting with raw glass and working through a sequence of decisions that determine whether the finished piece will perform, hold up, and actually look the way it was intended to. Those two perspectives don’t always line up, and the gap between them is exactly where problems — or, done well, exceptional results — come from.
1. The Finished Table Hides a Lot of Decisions
A glass tabletop can look deceptively simple. There may be nothing visually complicated about a clear rectangular panel resting on a base. It sits in a room quietly, reflecting light, holding a centerpiece, doing its job without asking for attention.
But before that piece of glass reaches an interior, a series of fabrication decisions have already determined how it will look, feel, and perform. Someone selected a glass type. Someone specified a thickness. Someone decided how the edge would be finished, how the corners would be treated, where the holes would go, and how the whole piece would be supported once it left the shop. None of that is visible in the final photograph. All of it is felt the first time someone runs a hand along the edge, or notices — months later — that the glass hasn’t scratched, sagged, or shifted.
This is the gap between how a tabletop is designed and how it is built. A designer specifies an outcome: clear glass, this size, this shape. A fabricator has to solve for everything in between. And that’s the core idea worth sitting with:
The quality of a glass tabletop is often revealed in the details people don’t notice immediately.
2. Start With the Glass — Not the Table
Every tabletop decision starts with a material choice, and that choice is rarely just about clarity or color. It’s about how the glass will behave once it’s cut, polished, loaded, and lived with.
Clear float glass is the default starting point for most tabletops — flat, consistent, and economical. But float glass has a natural greenish cast, especially visible along thicker edges, which becomes more noticeable as thickness increases.
Low-iron glass removes most of that green tint by reducing iron oxide content during manufacturing. It reads as truer, more neutral, especially important when the tabletop sits over a light wood, a white surface, or anything where color accuracy matters. It costs more, but on a thick tabletop with a visible edge, the difference is not subtle.
Tinted glass — grey, bronze, blue-grey — changes how a tabletop interacts with the room rather than disappearing into it. It’s a deliberate visual statement, often used to soften reflections or coordinate with a base material.
Patterned glass introduces texture into the surface itself, useful when a designer wants diffusion, privacy, or a decorative effect rather than a fully transparent plane.
Tempered glass is heat-treated to increase strength and, critically, to change how it fails. Tempered glass breaks into small, relatively blunt fragments rather than long shards — a safety requirement for most tabletop applications, particularly where the glass could be struck or where local code requires safety glazing.
Laminated glass bonds two or more layers together with an interlayer, so that if the glass breaks, the pieces stay adhered rather than separating. This matters for larger spans, for tabletops in high-traffic commercial settings, and anywhere the consequence of breakage needs to be contained rather than just softened.
None of these are interchangeable. A fabricator reads the glass type as the first constraint on everything downstream: it determines what edge treatments are even possible, how the piece will need to be handled, and what tolerances the rest of the fabrication has to work within.

3. Thickness Is More Than a Number
It would be easy to write: “Glass tabletops are available in different thicknesses.” That sentence is true and says almost nothing. Thickness is one of the most consequential specifications on the entire piece, and it does far more than resist bending.
Visual weight. A 3/8″ top reads as light, almost incidental — the base does the visual work. A 3/4″ or 1″ top reads as substantial, with the glass itself becoming part of the table’s presence rather than a transparent afterthought.
Edge appearance. Thin glass shows a thin edge line, no matter how it’s polished. Thick glass gives an edge profile room to actually do something — a bevel has more surface to catch light, a pencil edge has more material to round into a real curve. Edge detail and thickness are not independent choices; thickness sets the ceiling on what the edge can express.
Perceived solidity. People touch tabletops. They rest a hand on the edge, lean on a corner, set down something heavy without thinking about it. Thickness is one of the ways a tabletop communicates, physically, that it can take that load — independent of whether the engineering actually requires it.
Fabrication possibilities. Certain edge profiles, certain hole placements near an edge, certain corner treatments simply aren’t achievable — or aren’t advisable — below a given thickness. A fabricator is constantly checking a design intent against what the glass can structurally support at the specified thickness.
Table proportions. A large-format top in thin glass can look under-built relative to its footprint, no matter how well it performs structurally. Thickness has to be proportioned to span, not just to load.
Support requirements. Thickness and support are a single engineering conversation, not two separate ones — see Section 8. A thinner top demands more frequent or more capable support; a thicker top can span further with less.
Here’s the expert observation worth repeating to anyone specifying a tabletop:
“Look at the edge — not the center of the tabletop.”
The center of a glass tabletop is, by definition, the least interesting part of it — flat, transparent, uniform. The edge is where the thickness becomes visible, where the fabrication choices concentrate, and where the difference between a well-made piece and a rushed one shows up first.
4. The Edge Is Where Fabrication Becomes Visible
If there’s a signature section in how a fabricator thinks about a tabletop, this is it. The edge is not a boundary — it’s a surface, and it’s the one surface on the entire piece where the fabrication process leaves a visible signature.
Seamed Edge The most basic treatment: a functional, low-cost pass that removes the sharpness of the raw cut edge. It’s not meant to be a design feature. It’s meant to make the glass safe to handle. Seamed edges are common on utility pieces or where the edge will be largely hidden.
Flat Polish A clean, perpendicular edge, ground and polished to a smooth, glossy finish. It’s a refined, minimal look — a crisp line where the top surface meets the edge at a true right angle. This is often the default “premium standard” edge for contemporary tabletops because it reads as precise without adding ornamentation.
Pencil Polish A rounded profile, softened from a hard corner into a gentle convex curve along the full edge. Pencil polish changes both the tactile experience — no hard line under the hand — and the visual character, giving the tabletop a softer silhouette. It’s a common choice for family or high-touch environments where a rounded edge reduces the sense of a “hard” object in the room.
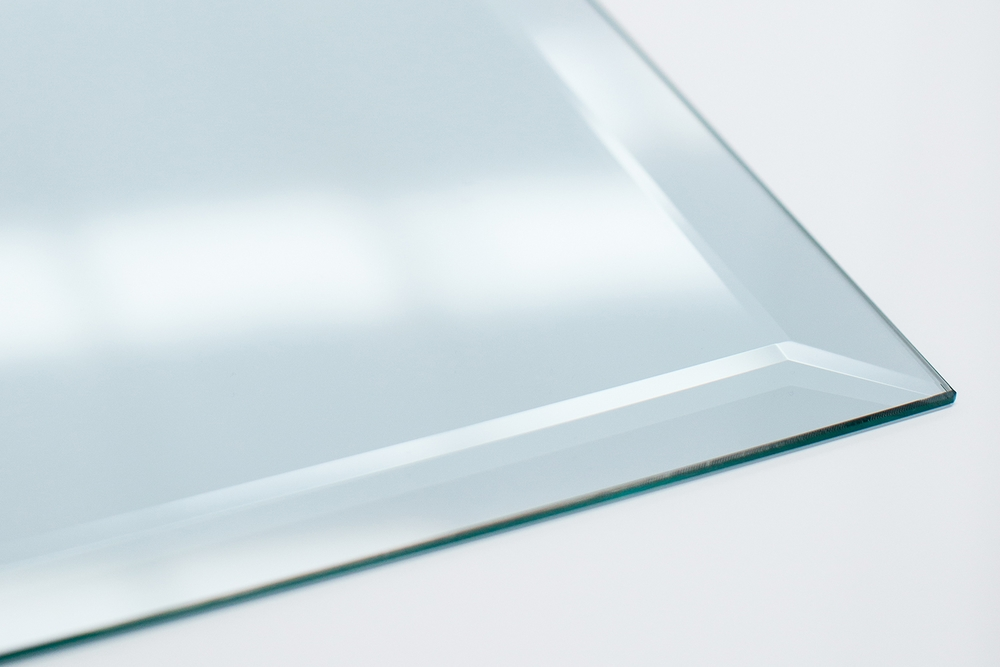
Bevel An angled cut along the top edge that catches and refracts light along the perimeter of the glass. On thicker glass especially, a bevel creates a visible band of light and shadow that moves as the viewer moves — a detail that has no functional purpose beyond what it does optically, which is exactly why it reads as a deliberate design choice rather than a default.
Miter A more architectural treatment, typically used where two edges meet — around corners, or in fabricated glass assemblies where panels are joined at an angle. A mitered corner is more technically demanding to execute cleanly than a straight edge treatment, and it’s usually a signal that the piece was designed with the corner condition specifically in mind, not just the field of the glass.

The bigger point is this:
“The edge isn’t merely the boundary of the tabletop. It is one of the few places where the fabrication process becomes directly visible.”
Everywhere else on the piece, good fabrication is invisible by design — a flat surface should just look flat, a clear panel should just look clear. The edge is different. It’s the one place where the glass has been actively shaped, and where the skill (or lack of it) behind the piece shows up under direct inspection.
5. Corners Are Not a Detail — They’re a Structural Decision
Corners take more stress than any other point on a tabletop. They’re where impacts land, where people brush past, where a chair or a bag catches the glass. A fabricator treats corner geometry as functional, not cosmetic.
- Square corners carry the highest concentration of stress and the highest risk of chipping on impact, which is why they’re typically reserved for smaller pieces or applications where the aesthetic calls for a hard geometric line.
- Rounded corners (radiused) distribute impact stress across a curve instead of a point, meaningfully reducing chip risk — a standard recommendation for tabletops in active households or commercial settings.
- Clipped or angled corners offer a middle ground, softening the point without fully rounding it, often chosen to echo a base or frame geometry.
Corner treatment also has to be coordinated with edge profile. A pencil-polished edge that terminates in a sharp square corner looks and feels unfinished — the two treatments need to read as one continuous decision, not two separate ones bolted together.
6. Finishing: The Difference Between “Cut” and “Complete”
Finishing covers everything that happens after the glass has been shaped — polishing, cleaning, quality inspection, and any secondary treatment like acid-etching or applied coatings. It’s also where a fabricator catches the flaws that don’t show up until the piece is handled under real light: a polish line that’s slightly uneven, a corner that wasn’t fully radiused, a seam that reads rougher under raking light than it did under shop lighting.
Finishing is also where tempering happens, if specified. Tempering has to occur after every cut, hole, and edge profile is finalized, and it introduces its own visual signature — a faint, shifting pattern (sometimes called “leopard spotting” or quench marks) visible under polarized light, most noticeable through sunglasses or certain LED lighting. It’s a normal, expected characteristic of tempered glass, not a defect, but it is the kind of detail a fabricator knows to flag to a client so it is not mistaken for a flaw after installation.
7. Support: The Engineering Question Hiding Under the Table
A tabletop’s finish gets the attention, but its support system determines whether that finish survives. Support has to account for:
- Span and thickness together — how far the glass reaches between support points relative to how thick it is, which determines deflection under load.
- Contact points — glass should never rest directly on a hard, unpadded surface. Rubber, felt, or gasket setting blocks distribute load and prevent point-stress that can lead to cracking, especially at corners.
- Base material and geometry — a metal or wood base needs to be engineered to match the actual load path of the glass, not just its footprint.
A fabricator thinks about support as inseparable from the glass specification itself — thickness, glass type, and support system are one structural decision made in three parts, not three independent choices.
8. Installation: Where All the Prior Decisions Get Tested at Once
Installation is the moment every upstream decision either holds up or doesn’t. It’s where a fabricator confirms that:
- The base is level and won’t introduce twisting stress into the glass.
- Setting blocks and gaskets are correctly positioned at the specified contact points.
- Holes and cutouts align precisely with hardware — with zero room for on-site adjustment.
- The glass has clearance from any hard surface (metal-to-glass contact, especially without cushioning, is a common cause of edge chipping during install, not manufacturing).
A well-fabricated tabletop can still be damaged by a rushed or careless installation, which is why the fabrication process doesn’t really end at the shop door. It ends when the piece is set, supported correctly, and confirmed stable under its intended load.
The Takeaway
A glass tabletop looks like a single, simple object. It isn’t. It’s the end result of a sequence — glass type, thickness, dimensions, shape, edge profile, corners, holes, finishing, support, installation — where each decision constrains and shapes the next.
Designers specify the outcome. Fabricators solve the chain that gets there. The next time a glass tabletop looks effortless, it’s worth remembering: that’s not the absence of decisions. That’s what a well-executed set of them looks like.